This is a detailed description — step-by-step — for processing the EMPIAR-10787 dataset.
Data import and organization
Download the entire dataset from EMPIAR-10787 (including the gain reference image ‘gain.mrc’). And organize the data in the following folder structure:
- your/folder/to/apoferritin-10787/process/
- frames/
- TS_03/
- TS_04/
- …
- tomos/
- TS_03/
- TS_04/
- …
- avg/
- motls/
- parts/
- refs/
- cfg/
- frames/
with the individual frame-stacks in the corresponding folder of each tilt-series and the gain-reference image in ‘your/folder/to/apoferritin-10787/process/frames/’
Before starting any processing, first have a look at the actual data. For this open in aiClicker one of the movie-stack-tif files:
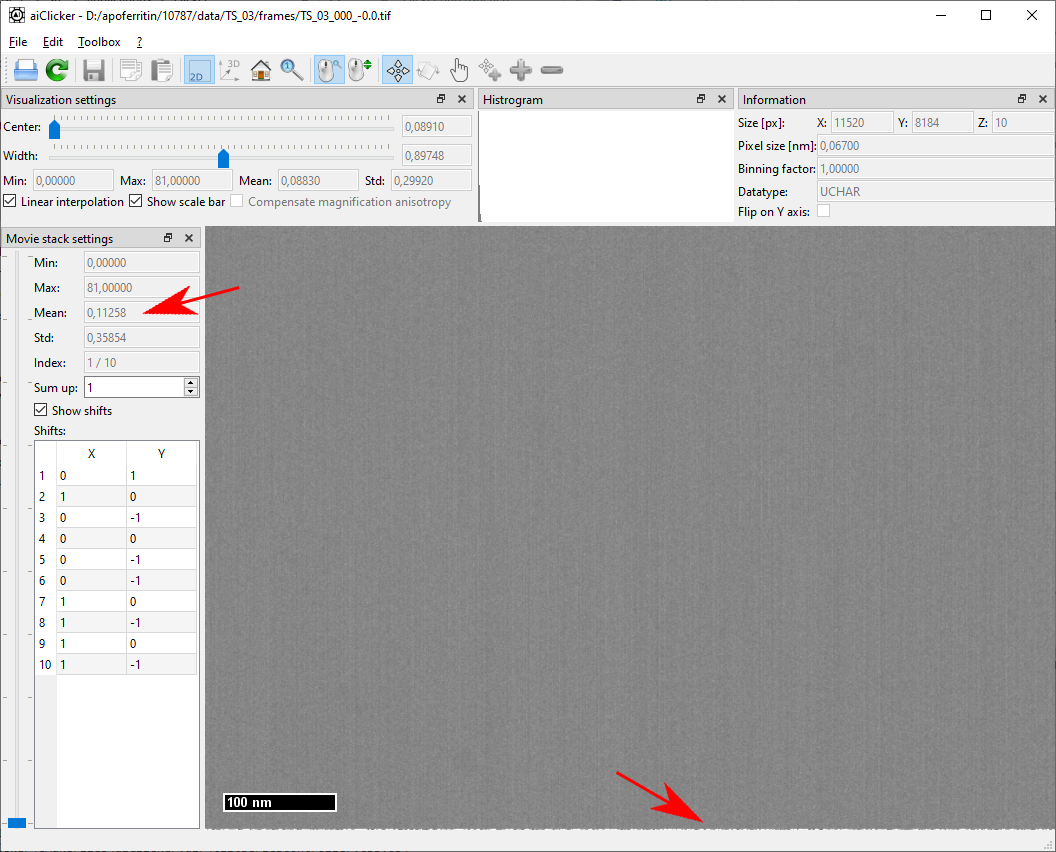
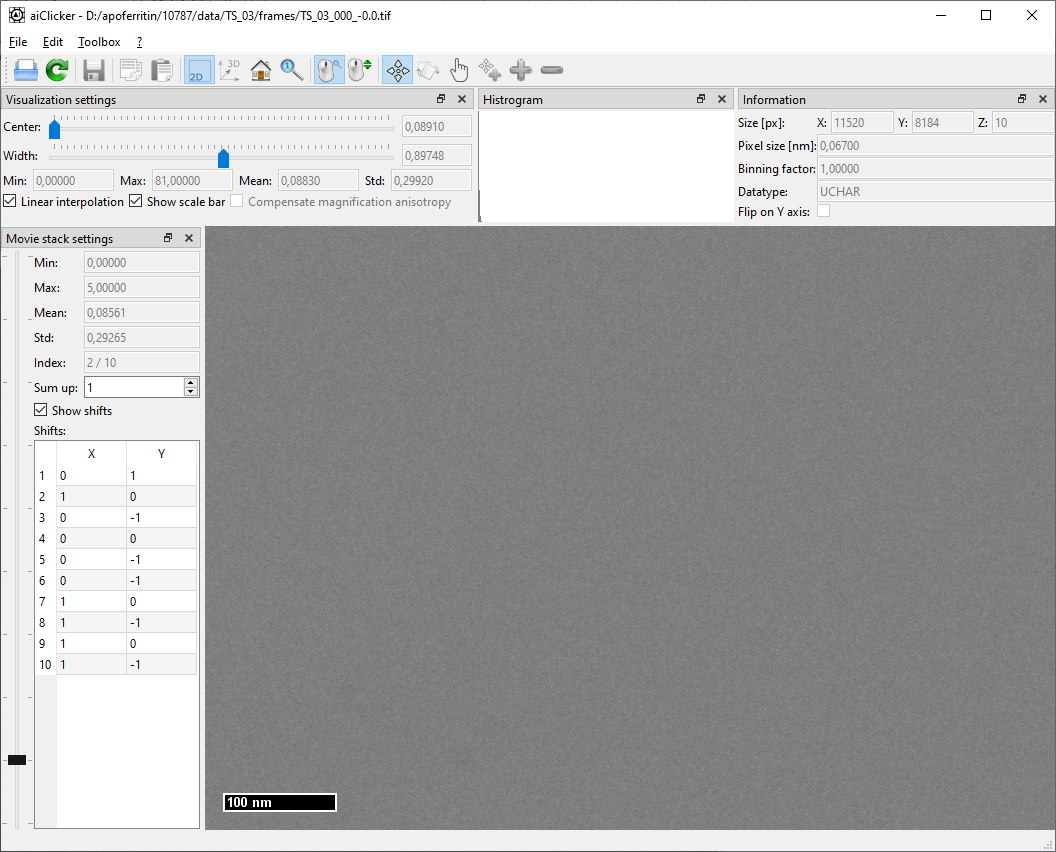
For any movie-stack in the dataset, one can see that the first frame contains more dose (frame mean value) and more artifacts (striping as in the gain reference and a line of white pixels at the bottom) than the other frames in the movie stack. This is likely because the camera starts acquiring the stack before the beam-blanker enables the electron beam. On the other hand, this also means that the first frame will very likely include the movement of the electron beam due to the beam blanker: It is thus advantageous to discard the first frame from the final tilt-series.
aiImageStackAlignator
aiImageStackAlignator will align the movie stacks for each tilt and create a single MRC-tilt series file with an additional metadata file (.info) containing all necessary data for Artiatomi.
The dataset doesn’t come with a SerialEM-MDOC-file, data import is thus manual using the csv-file import of aiImageStackAlignator. For each tilt-series, create a csv-text file with the needed information. The csv-file has to be stored in the same folder as the corresponding tif-movie-stack files. For the first tilt-series (TS_03), the file has the following content:
41
Filename;TiltAngle;PixelSize;AcquisitionIndex;ImageRotation;Cs;Voltage;AccumulatedDose;Binning;Defocus;FlipOnYAxis;TomogramNr
TS_03_000_-0.0.tif;0;0.067;0;4.7;2.7;300;0;1;2000;false;3
TS_03_001_3.0.tif;3;0.067;1;4.7;2.7;300;2.5;1;2000;false;3
TS_03_002_6.0.tif;6;0.067;2;4.7;2.7;300;5;1;2000;false;3
TS_03_003_-3.0.tif;-3;0.067;3;4.7;2.7;300;7.5;1;2000;false;3
TS_03_004_-6.0.tif;-6;0.067;4;4.7;2.7;300;10;1;2000;false;3
TS_03_005_9.0.tif;9;0.067;5;4.7;2.7;300;12.5;1;2000;false;3
TS_03_006_12.0.tif;12;0.067;6;4.7;2.7;300;15;1;2000;false;3
TS_03_007_-9.0.tif;-9;0.067;7;4.7;2.7;300;17.5;1;2000;false;3
TS_03_008_-12.0.tif;-12;0.067;8;4.7;2.7;300;20;1;2000;false;3
TS_03_009_15.0.tif;15;0.067;9;4.7;2.7;300;22.5;1;2000;false;3
TS_03_010_18.0.tif;18;0.067;10;4.7;2.7;300;25;1;2000;false;3
TS_03_011_-15.0.tif;-15;0.067;11;4.7;2.7;300;27.5;1;2000;false;3
TS_03_012_-18.0.tif;-18;0.067;12;4.7;2.7;300;30;1;2000;false;3
TS_03_013_21.0.tif;21;0.067;13;4.7;2.7;300;32.5;1;2000;false;3
TS_03_014_24.0.tif;24;0.067;14;4.7;2.7;300;35;1;2000;false;3
TS_03_015_-21.0.tif;-21;0.067;15;4.7;2.7;300;37.5;1;2000;false;3
TS_03_016_-24.0.tif;-24;0.067;16;4.7;2.7;300;40;1;2000;false;3
TS_03_017_27.0.tif;27;0.067;17;4.7;2.7;300;42.5;1;2000;false;3
TS_03_018_30.0.tif;30;0.067;18;4.7;2.7;300;45;1;2000;false;3
TS_03_019_-27.0.tif;-27;0.067;19;4.7;2.7;300;47.5;1;2000;false;3
TS_03_020_-30.0.tif;-30;0.067;20;4.7;2.7;300;50;1;2000;false;3
TS_03_021_33.0.tif;33;0.067;21;4.7;2.7;300;52.5;1;2000;false;3
TS_03_022_36.0.tif;36;0.067;22;4.7;2.7;300;55;1;2000;false;3
TS_03_023_-33.0.tif;-33;0.067;23;4.7;2.7;300;57.5;1;2000;false;3
TS_03_024_-36.0.tif;-36;0.067;24;4.7;2.7;300;60;1;2000;false;3
TS_03_025_39.0.tif;39;0.067;25;4.7;2.7;300;62.5;1;2000;false;3
TS_03_026_42.0.tif;42;0.067;26;4.7;2.7;300;65;1;2000;false;3
TS_03_027_-39.0.tif;-39;0.067;27;4.7;2.7;300;67.5;1;2000;false;3
TS_03_028_-42.0.tif;-42;0.067;28;4.7;2.7;300;70;1;2000;false;3
TS_03_029_45.0.tif;45;0.067;29;4.7;2.7;300;72.5;1;2000;false;3
TS_03_030_48.0.tif;48;0.067;30;4.7;2.7;300;75;1;2000;false;3
TS_03_031_-45.0.tif;-45;0.067;31;4.7;2.7;300;77.5;1;2000;false;3
TS_03_032_-48.0.tif;-48;0.067;32;4.7;2.7;300;80;1;2000;false;3
TS_03_033_51.0.tif;51;0.067;33;4.7;2.7;300;82.5;1;2000;false;3
TS_03_034_54.0.tif;54;0.067;34;4.7;2.7;300;85;1;2000;false;3
TS_03_035_-51.0.tif;-51;0.067;35;4.7;2.7;300;87.5;1;2000;false;3
TS_03_036_-54.0.tif;-54;0.067;36;4.7;2.7;300;90;1;2000;false;3
TS_03_037_57.0.tif;57;0.067;37;4.7;2.7;300;92.5;1;2000;false;3
TS_03_038_60.0.tif;60;0.067;38;4.7;2.7;300;95;1;2000;false;3
TS_03_039_-57.0.tif;-57;0.067;39;4.7;2.7;300;97.5;1;2000;false;3
TS_03_040_-60.0.tif;-60;0.067;40;4.7;2.7;300;100;1;2000;false;3
With the first line indicating the number of frames in the tilt-series, the second line the order and the kind of information provided in the following lines. Some information is missing, like the defocus used during acquisition, which is just filled with some meaningful default value (2000 nm in this case). The image rotation has been determined to be around 4.7 degrees, a value we found first by playing a tilt-series in aiClicker and aligned the tilt-axis on the image’s x-axis and that we further refined using a marker model. Once we had the value for the first tilt-series, we applied the same value for all the others.
The raw dose-fractionation movie stacks are stored as compressed TIF-files and need to be gain-corrected using the gain reference image before any processing.
The configuration file for aiImageStackAlignator looks as follows:
CudaDeviceID = 0
Interpolation = LINEAR
LP = 200
LPS = 50
HP = 0
HPS = 0
Output = ..\..\tomos\TS_#2#\tomo_##.st
MaxShift = 250
AlignmentMethod = FULL
BlockSize = 0
OutputDataType = USHORT
Algorithm = BOTH
CorrectMissingStripes = false
SubpixelPrecision = 1
OutputScaling = 1000
OutputOffset = 0
RefineThreshold = 1
DeadPixelMap =
GainReference = /your/folder/to/apoferritin-10787/process/frames/gain.mrc
Skip = 1
SkipShift = 30
DosePerTilt = 3
AdditionalDoseFirstTilt = 0
FrameMetadata = metadata
DeadPixelRemoval = ABSOLUTE
DeadPixelThreshold = 10
And should be saved in the …/process/cfg/ folder. The values defined above result in a strong low pass filter (LP = 200), the output is defined relative to the input file, where ‘#2#’ and ‘##’ will be replaced by the tomogram number defined in the csv-file. As mentioned above, the first frame contains too many artifacts, why “Skip” is set to 1 in order to ignore the first frame in the final image. Also frames with a relative shift of more than 30 pixels will be ignored as indicated by “SkipShift = 30”.
Run aiImageStackAlignator for all the 6 tilt-series as such:
aiImageStackAlignator -u your/folder/to/apoferritin-10787/process/cfg/imageStackAlignator.cfg -i your/folder/to/apoferritin-10787/process/frames/TS_03/import.txt
aiImageStackAlignator -u your/folder/to/apoferritin-10787/process/cfg/imageStackAlignator.cfg -i your/folder/to/apoferritin-10787/process/frames/TS_04/import.txt
aiImageStackAlignator -u your/folder/to/apoferritin-10787/process/cfg/imageStackAlignator.cfg -i your/folder/to/apoferritin-10787/process/frames/TS_05/import.txt
aiImageStackAlignator -u your/folder/to/apoferritin-10787/process/cfg/imageStackAlignator.cfg -i your/folder/to/apoferritin-10787/process/frames/TS_06/import.txt
aiImageStackAlignator -u your/folder/to/apoferritin-10787/process/cfg/imageStackAlignator.cfg -i your/folder/to/apoferritin-10787/process/frames/TS_26/import.txt
aiImageStackAlignator -u your/folder/to/apoferritin-10787/process/cfg/imageStackAlignator.cfg -i your/folder/to/apoferritin-10787/process/frames/TS_53/import.txt
aiCoarseTiltSeriesAlignator
aiCoarseTiltSeriesAlignator will perform a fast coarse shift alignment for each tilt series. For this, create a configuration file for aiCoarseTiltSeriesAlignator with the following content:
CudaDeviceID = 0
Input =
LP = 50
LPS = 20
HP = 0
HPS = 0
MaxTiltDifference = 7
MaxShift = 0
ImageRotation = -360
DisableFailedFrames = true
And save it in the …/process/cfg/ folder as “coarseTiltSeriesAlignator.cfg”. Run aiCoarseTiltSeriesAlignator with all 6 tilt-series:
aiCoarseTiltSeriesAlignator -u your/folder/to/apoferritin-10787/process/cfg/coarseTiltSeriesAlignator.cfg -i your/folder/to/apoferritin-10787/process/tomos/TS_03/tomo_3.st
aiCoarseTiltSeriesAlignator -u your/folder/to/apoferritin-10787/process/cfg/coarseTiltSeriesAlignator.cfg -i your/folder/to/apoferritin-10787/process/tomos/TS_04/tomo_4.st
aiCoarseTiltSeriesAlignator -u your/folder/to/apoferritin-10787/process/cfg/coarseTiltSeriesAlignator.cfg -i your/folder/to/apoferritin-10787/process/tomos/TS_05/tomo_5.st
aiCoarseTiltSeriesAlignator -u your/folder/to/apoferritin-10787/process/cfg/coarseTiltSeriesAlignator.cfg -i your/folder/to/apoferritin-10787/process/tomos/TS_06/tomo_6.st
aiCoarseTiltSeriesAlignator -u your/folder/to/apoferritin-10787/process/cfg/coarseTiltSeriesAlignator.cfg -i your/folder/to/apoferritin-10787/process/tomos/TS_26/tomo_26.st
aiCoarseTiltSeriesAlignator -u your/folder/to/apoferritin-10787/process/cfg/coarseTiltSeriesAlignator.cfg -i your/folder/to/apoferritin-10787/process/tomos/TS_53/tomo_53.st
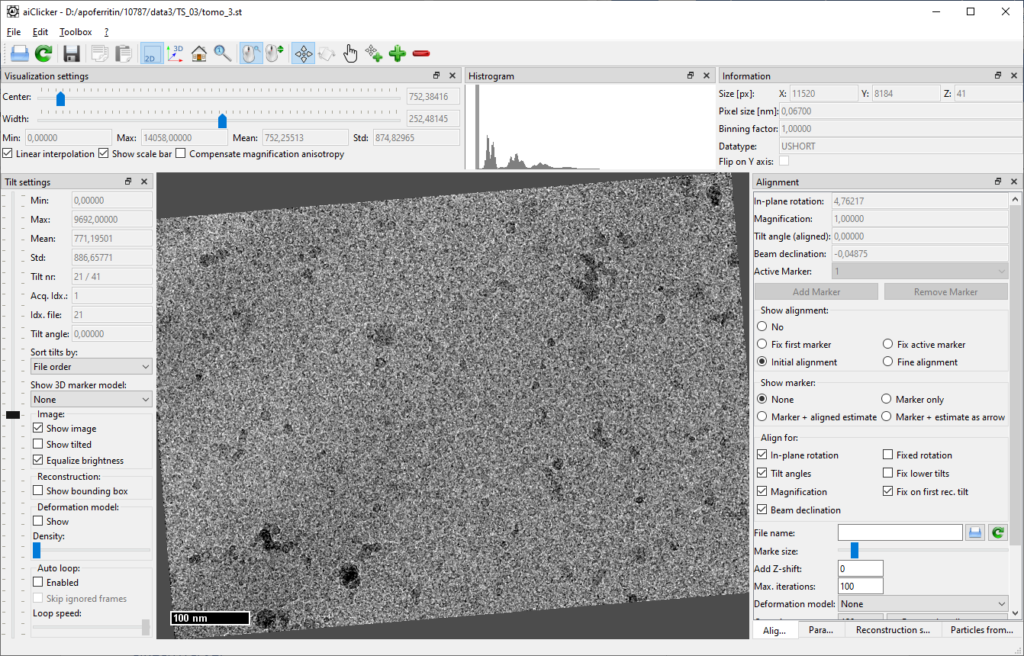
It is advisable to check for successful alignment in aiClicker: When visualizing the initial alignment, the tilt series should now appear with smooth shifts and the tilt axis is supposed to be close to the X-Axis.
aiPatchTracker
As the dataset does not contain any gold beads for a marker model, aiPatchTracker is used that will track patches from one tilt to the other.
In the …/process/cfg/ folder, create the configuration file “patchTracking.cfg” with the following content:
AlignBeamDeclination = true
AlignInPlaneRotation = true
AlignTilt = true
AlignMagnification = true
AlignMaxIterations = 100
AlignZShift = 0
Input =
CudaDeviceID = 0
PatchSize = 2048
PatchDistance = 1024
MaxDistance = 5
MinTrackLength = 10
LowPassLow = 10
LowPassHigh = 100
LowPassSteps = 10
SeedTilts = 20
AlignmentFile = alignPatch
AlignMarkers = true
FilterLimit = 15
FixLowerTiltAngles = true
And run aiPatchTracker for each tilt-series:
aiPatchTracker -u your/folder/to/apoferritin-10787/process/cfg/patchTracking.cfg -i your/folder/to/apoferritin-10787/process/tomos/TS_03/tomo_3.st
aiPatchTracker -u your/folder/to/apoferritin-10787/process/cfg/patchTracking.cfg -i your/folder/to/apoferritin-10787/process/tomos/TS_04/tomo_4.st
aiPatchTracker -u your/folder/to/apoferritin-10787/process/cfg/patchTracking.cfg -i your/folder/to/apoferritin-10787/process/tomos/TS_05/tomo_5.st
aiPatchTracker -u your/folder/to/apoferritin-10787/process/cfg/patchTracking.cfg -i your/folder/to/apoferritin-10787/process/tomos/TS_06/tomo_6.st
aiPatchTracker -u your/folder/to/apoferritin-10787/process/cfg/patchTracking.cfg -i your/folder/to/apoferritin-10787/process/tomos/TS_26/tomo_26.st
aiPatchTracker -u your/folder/to/apoferritin-10787/process/cfg/patchTracking.cfg -i your/folder/to/apoferritin-10787/process/tomos/TS_53/tomo_53.st
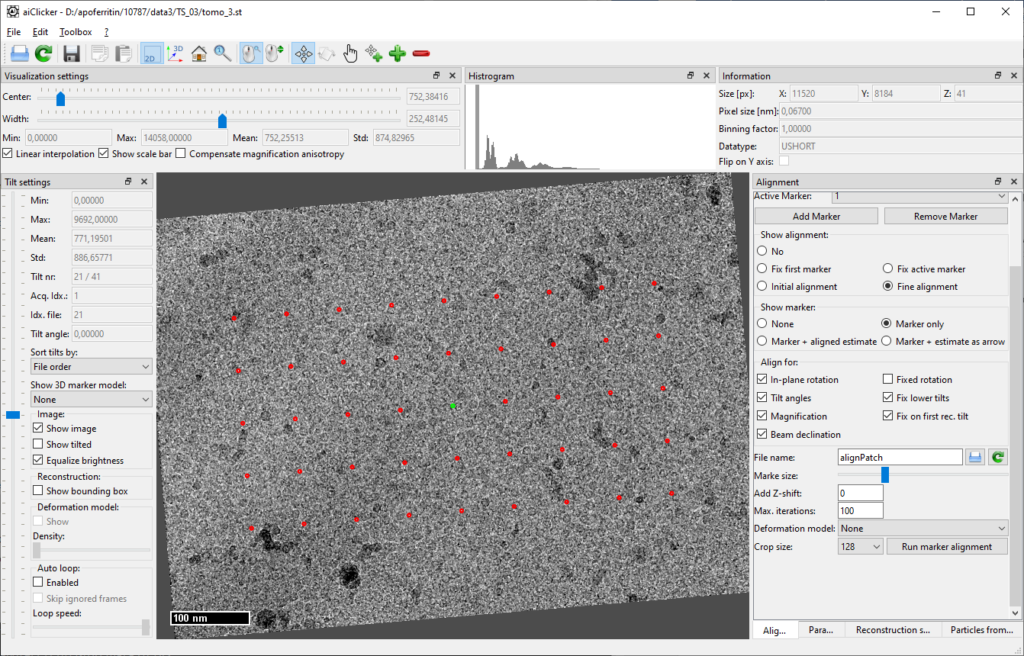
Again, check for successful tracking and alignment in aiClicker:
Finally, the reconstruction settings for each tilt-series need to be defined. In aiClicker, open the tab “Reconstruction settings” and fill in the values as depicted:
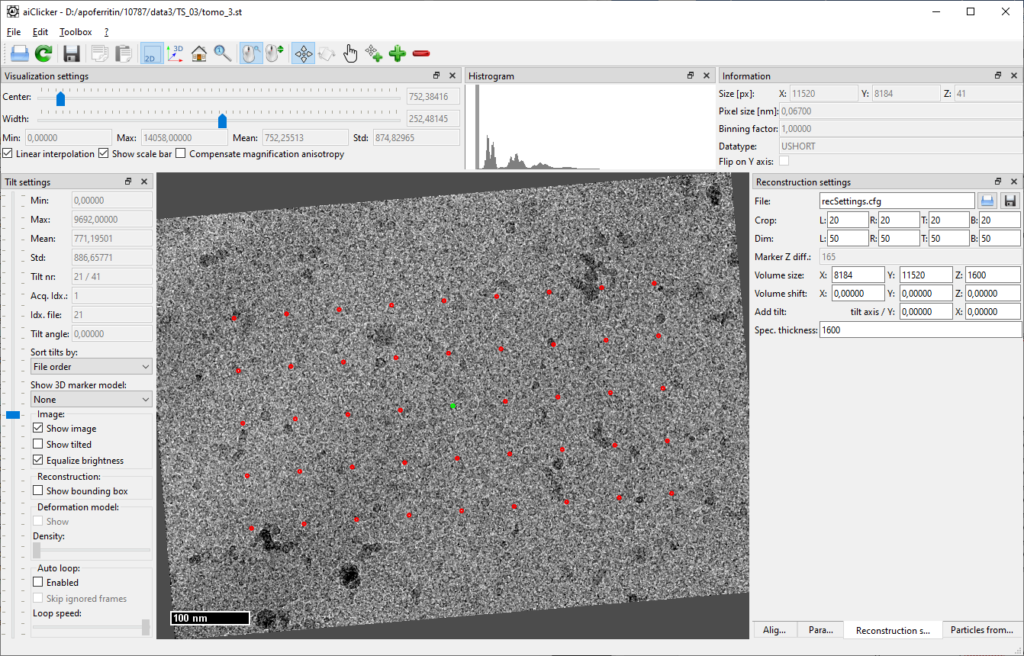
When clicking on the save-button next to the textbox with the file name (“recSettings.cfg”), aiClicker saves the file in the same folder as the tilt-series. Do this for all six tilt-series before moving over to reconstruction.
aiCtfDetectorGui
aiCtfDetectorGui provides a graphical user interface that allows to interactively determine CTF parameters for a tilt-series. Especially because no initial defocus values were provided with the dataset, the careful inspection of the thon-rings is mandatory.
In aiCtfDetectorGui open the first tilt-series of the dataset and choose the GPU to be used for calculations in the right panel. Note that once the GPU is set, this can’t be change until closing the application.
Then use the slider for “Mask sizes” to set the mask in a way so that the inner part of the power spectrum is removed as indicated in the screenshot. Now when clicking on “Check mask and filter” an image similar to the one below should appear:
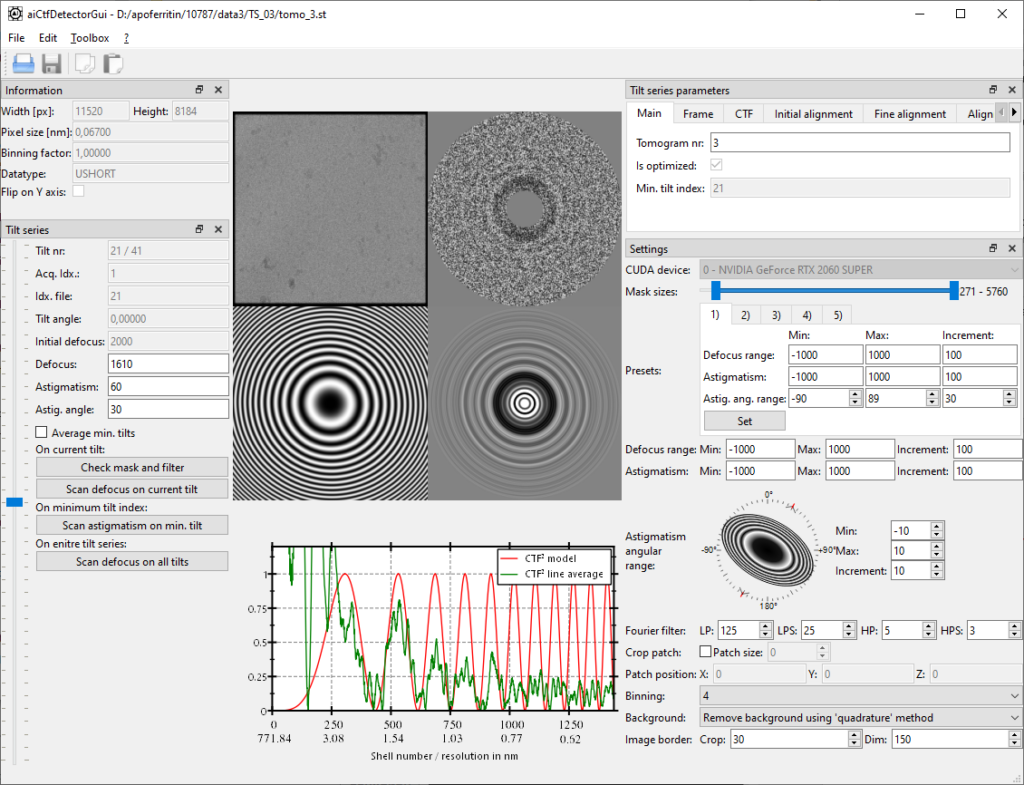
CTF determination works as follows:
- First determine with a coarse scan (In the textbox for defocus range -2000 -> 2000 with 100nm steps) the approximate defocus of the 0-degree tilt by clicking “Scan defocus on current tilt”. Note that the presets can be used to pre-define scan ranges.
- Then scan iteratively with astigmatism on the 0-degree tilt: -1000->1000/100 step, then -500->500/50 step and finally -100->100/10 step. The angles for astigmatism should always be kept on the full circle, especially if no strong astigmatism is present
- Once astigmatism determined on the 0-degree tilt, scan the entire tilt-series.
Once defocus determined for each tilt, verify on each tilt with a click on “Check mask and filter” for correctness and rescan on an erroneous tilt with the “Scan defocus on current tilt”.
Save the result by clicking on the diskette logo and proceed the same for all tilt series.
aiRec
aiRec is used to perform tomographic reconstruction of each tilt-series. Reconstruct each tilt series to a binned volume that will be used for template matching later on. To do this, define the following configuration file:
CudaDeviceIDs = [0 ]
Input =
OutVolumeFile = rec_##_WBPExact.em
LP = 400
LPS = 100
HP = 0
HPS = 0
ReconstructionSettings = recSettings.cfg
ReconstructionMethod = WBP
DimLength = 50 50
CutLength = 10 10
OverSampling = 2
VolumeBinning = 8
DoFourierFilter = true
CtfCorrectionType = PHASE_FLIP
CTFSliceThickness = 50
SwitchCTFDirection = false
IgnoreZShiftForCTF = true
FP16Volume = false
ProjectionScaleFactor = 1
ProjectionNormalization = MEAN
WBPFilter = EXACT
CosineWeighting = false
DoseWeighting = false
MissingFrameWeighting = false
Binning = 4
CompensateImageRotation = true
DeadPixelRemoval = NONE
And save it in the …/process/cfg/ folder as “rec.cfg”.
Run aiRec using these commands:
aiRec -u your/folder/to/apoferritin-10787/process/cfg/rec.cfg -i your/folder/to/apoferritin-10787/process/tomos/TS_03/tomo_3.st
aiRec -u your/folder/to/apoferritin-10787/process/cfg/rec.cfg -i your/folder/to/apoferritin-10787/process/tomos/TS_04/tomo_4.st
aiRec -u your/folder/to/apoferritin-10787/process/cfg/rec.cfg -i your/folder/to/apoferritin-10787/process/tomos/TS_05/tomo_5.st
aiRec -u your/folder/to/apoferritin-10787/process/cfg/rec.cfg -i your/folder/to/apoferritin-10787/process/tomos/TS_06/tomo_6.st
aiRec -u your/folder/to/apoferritin-10787/process/cfg/rec.cfg -i your/folder/to/apoferritin-10787/process/tomos/TS_26/tomo_26.st
aiRec -u your/folder/to/apoferritin-10787/process/cfg/rec.cfg -i your/folder/to/apoferritin-10787/process/tomos/TS_53/tomo_53.st
Each tilt-series directory now contains a volume file called “rec_TomoNr_WBPExact.em”. Check for successful reconstruction by opening the file in aiClicker.
aiToolbox: Preparing the references and masks for template matching and sub-tomogram averaging
Download the reference EMD-13271 coming with the dataset that will be used for template matching. The original file has an odd volume size, in Artiatomi even sizes, and better power of 2, are preferred. Hence, we crop and bin the original file to our needs with the following set of commands:
cd your/folder/to/apoferritin-10787/process/avg
aiToolbox volume import -i emd_13271.mrc -b 2 -ps 0.067
aiToolbox volume crop -i emd_13271.mrc -o emd_crop.em -xl 24 -xu 25 -yl 24 -yu 25 -zl 24 -zu 25
aiToolbox volume resize -i emd_crop.em -o emd_red2.em
aiToolbox volume resize -i emd_red2.em -o emd_red4.em
aiToolbox volume scaleOffset -i emd_red2.em -o refs/refOrig64Bin4_0_0.em -s -1
aiToolbox volume scaleOffset -i emd_red4.em -o refs/refOrig32Bin8_0_0.em -s -1
First, the original file is imported to Artiatomi by setting its binning and pixel size (binning compared to the tilt-series). Then the dimensions are cropped, so that the rotation and symmetry center is in the center of the central voxel of the resulting volume. Then the volume is binned twice and the contrast is inverted to match with Artiatomi conventions (electron density is black). The intermediate levels are also kept as they will be used later in sub-tomogram averaging.
Finally, create masks for each binning level with the commands:
aiToolbox volume sphericalMask -o mask32Bin8_0.em -lp 13 -lps 4 -hp 4 -hps 4 -s 32
aiToolbox volume sphericalMask -o mask64Bin4_0.em -lp 26 -lps 7 -s 64
aiToolbox volume sphericalMask -o mask128Bin2_0.em -lp 48 -lps 7 -s 128
aiToolbox volume sphericalMask -o mask256Bin1_0.em -lp 97 -lps 12 -hp 46 -hps 10 -s 256
Note: the naming convention with the trailing “_0” in the filename for masks helps to identify individual masks with a number. Although this is not the case here, this convention allows to use different masks for multiple references.
aiTemplateMatching
aiTemplateMatching detects the position and the orientation of a given reference in a tomogram. Both, position and orientation are stored in a so called motivelist that is also used for further processing in sub-tomogram averaging.
Apoferritin is highly symmetric and basically has no features at lower resolutions. Low-pass filtered, it looks more like a uniform sphere or ring which in turn makes it unnecessary to scan for rotational orientations. Hence, template matching will be extremely fast. The configuration file for template-matching:
CudaDeviceIDs = [0 1 2 3]
Input =
LP = 16
LPS = 0
HP = 0
HPS = 0
MotiveList = motlMatch.motl
Reference = your/folder/to/apoferritin-10787/process/avg/refs/refOrig32Bin8_0_0.em
ReferenceNr = 0
Mask = your/folder/to/apoferritin-10787/process/avg/mask32Bin8_0.em
AngIter = 0
AngIncr = 10
PhiAngIter = 0
PhiAngIncr = 10
CouplePhiToPsi = true
Threshold = 0.03
MaxParticleCount = 10000
MinDist = 70
Fragments = 0
ExtendedStatistics = false
CorrelationMethod = CROSSCORRELATION
Execute aiTemplateMatching for each tomogram:
mpiexec -n 4 aiTemplateMatching -u your/folder/to/apoferritin-10787/process/cfg/templateMatching.cfg -i your/folder/to/apoferritin-10787/process/tomos/TS_03/rec_3_WBPExact.em
mpiexec -n 4 aiTemplateMatching -u your/folder/to/apoferritin-10787/process/cfg/templateMatching.cfg -i your/folder/to/apoferritin-10787/process/tomos/TS_04/rec_4_WBPExact.em
mpiexec -n 4 aiTemplateMatching -u your/folder/to/apoferritin-10787/process/cfg/templateMatching.cfg -i your/folder/to/apoferritin-10787/process/tomos/TS_05/rec_5_WBPExact.em
mpiexec -n 4 aiTemplateMatching -u your/folder/to/apoferritin-10787/process/cfg/templateMatching.cfg -i your/folder/to/apoferritin-10787/process/tomos/TS_06/rec_6_WBPExact.em
mpiexec -n 4 aiTemplateMatching -u your/folder/to/apoferritin-10787/process/cfg/templateMatching.cfg -i your/folder/to/apoferritin-10787/process/tomos/TS_26/rec_26_WBPExact.em
mpiexec -n 4 aiTemplateMatching -u your/folder/to/apoferritin-10787/process/cfg/templateMatching.cfg -i your/folder/to/apoferritin-10787/process/tomos/TS_53/rec_53_WBPExact.em
(Note that “mpiexec -n 4” assumes that four GPUs are available on the PC)
At the end, each tomogram folder will contain a new motivelist with the detected positions. The thresholds are set very low so that many false positives are kept in the list. To clean up the motivelist at a precise threshold, open each tomogram with its corresponding motivelist in aiClicker:
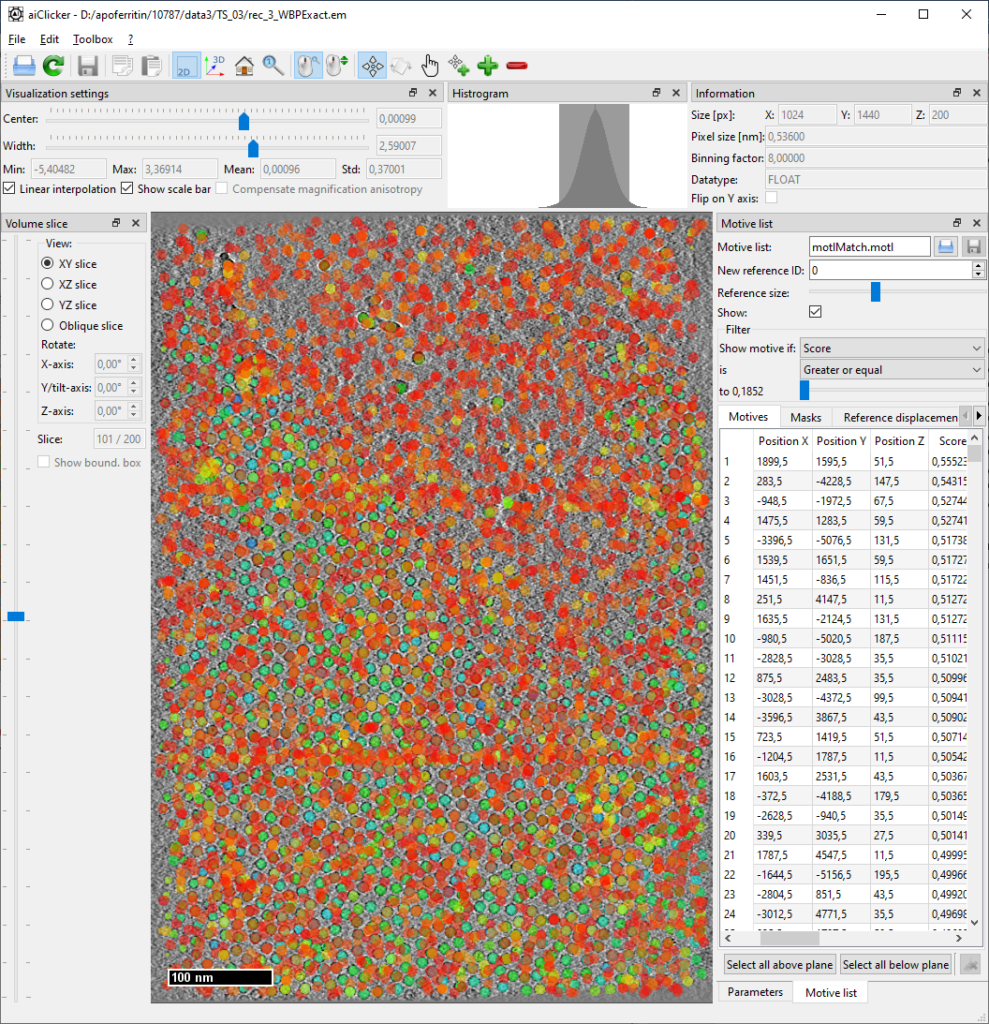
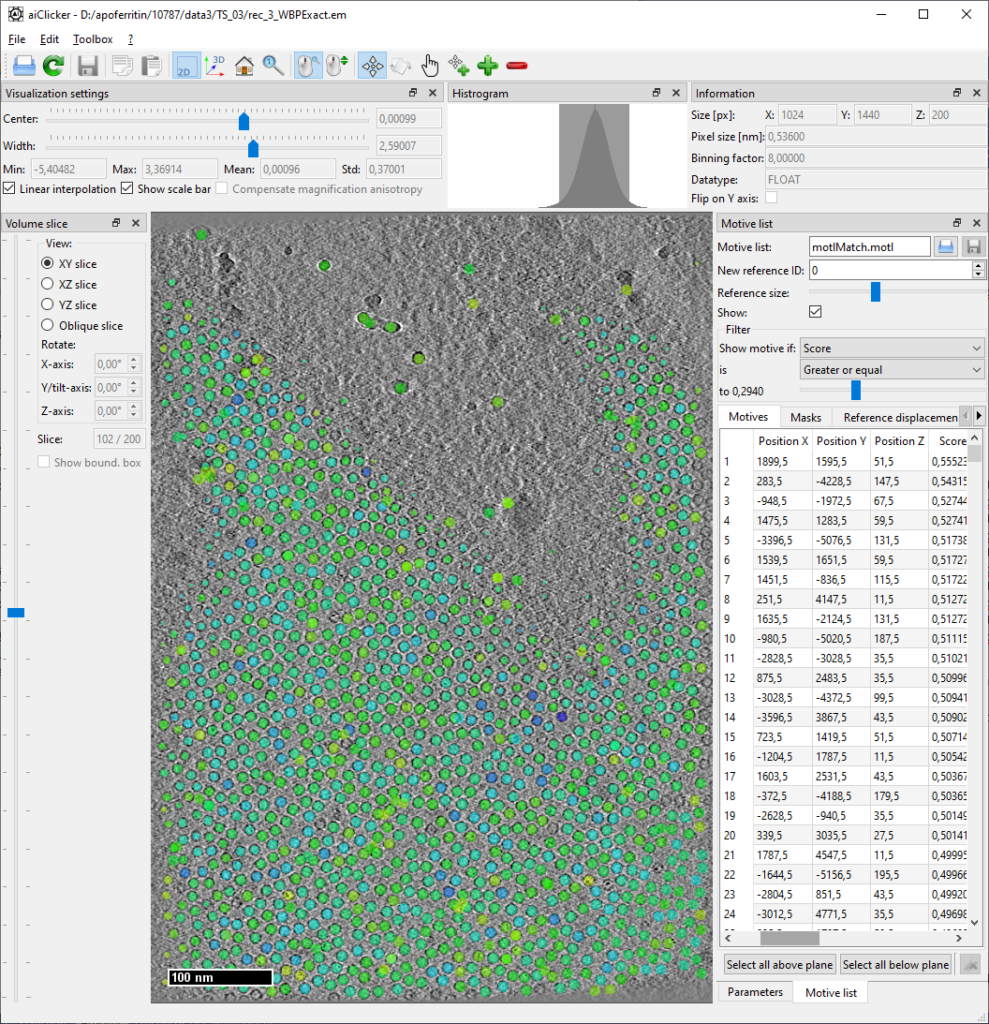
Deletion of positions based on threshold
Set the filter for motive list to filter for “Score” and “Greater or equal” as shown in picture. Find the threshold that minimizes obvious outliers but still maintains all apoferritin particles. Then sort the motive list by “Score” by clicking on the table header, select all items below the found threshold and click the “delete” button in the lower right corner. (Note: Maybe in a future version we’ll add a feature to select automatically by filter, for now, this is how it works…)
Deletion of positions based on context (manual deletion)
There will always be some outliers, especially in regions with high contrast, such as dirt and contaminations on top of the ice. Having the motive list already open, remove those erroneous positions from the list by switching to “delete” mouse mode (![]() icon) and click the marker positions that are not apoferritin.
icon) and click the marker positions that are not apoferritin.
After filtering and cleaning, rename the motivelist to “motlCleaned.motl” by typing the name in the text box and hit the save button next to it.
Finally, merge all individual motivelists to one large list for the entire dataset using:
aiToolbox motivelist merge -p -o your/folder/to/apoferritin-10787/process/avg/motls/motlAll_0.motl -i your/folder/to/apoferritin-10787/process/tomos/TS_03/motlCleaned.motl your/folder/to/apoferritin-10787/process/tomos/TS_04/motlCleaned.motl your/folder/to/apoferritin-10787/process/tomos/TS_05/motlCleaned.motl your/folder/to/apoferritin-10787/process/tomos/TS_06/motlCleaned.motl your/folder/to/apoferritin-10787/process/tomos/TS_26/motlCleaned.motl your/folder/to/apoferritin-10787/process/tomos/TS_53/motlCleaned.motland set the mask id for the reference ‘0’:
aiToolbox motivelist set --mask 0 0 -i your/folder/to/apoferritin-10787/process/avg/motls/motlAll_0.motl -o your/folder/to/apoferritin-10787/process/avg/motls/motlAll_0.motlaiRecSubvol
aiRecSubvol is used to reconstruct individual sub-volumes for each entry in the motivelist. The pixel size of the 8-times binned full reconstruction is too small to resolve any features in apoferritin – the first particles are thus directly reconstructed with only 4-times binning using the following settings stored in your/folder/to/apoferritin-10787/process/cfg/recSubVols64.cfg:
CudaDeviceIDs = [0 1 2 3]
Input =
OutVolumeFile = /your/folder/to/apoferritin-10787/process/avg/parts/partInit_#_#.em
OutWedgeFile =
ReconstructionSettings = recSettings.cfg
LP = 400
LPS = 100
HP = 0
HPS = 0
DimLength = 50 50
CutLength = 10 10
OverSampling = 2
RecDimensions = 256 256 256
VolumeBinning = 4
DoFourierFilter = false
CtfCorrectionType = PHASE_FLIP
CTFSliceThickness = 50
SwitchCTFDirection = false
IgnoreZShiftForCTF = true
FP16Volume = false
ProjectionScaleFactor = 1
ProjectionNormalization = MEAN
WBPFilter = NONE
DebugImages = false
CosineWeighting = true
DoseWeighting = true
MissingFrameWeighting = true
Binning = 2
CompensateImageRotation = false
SubVolumeRecMode = PARTICLE
BatchSize = 4000
MotiveList = /your/folder/to/apoferritin-10787/process/avg/motls/motlInit_0.motl
ExtraShifts =
ReduceGoldBeadArtifacts = false
And run aiRecSubvol for each tilt-series:
mpiexec -n 4 aiRecSubvol -u your/folder/to/apoferritin-10787/process/cfg/recSubVols64.cfg -i your/folder/to/apoferritin-10787/process/tomos/TS_03/tomo_3.st
mpiexec -n 4 aiRecSubvol -u your/folder/to/apoferritin-10787/process/cfg/recSubVols64.cfg -i your/folder/to/apoferritin-10787/process/tomos/TS_04/tomo_4.st
mpiexec -n 4 aiRecSubvol -u your/folder/to/apoferritin-10787/process/cfg/recSubVols64.cfg -i your/folder/to/apoferritin-10787/process/tomos/TS_05/tomo_5.st
mpiexec -n 4 aiRecSubvol -u your/folder/to/apoferritin-10787/process/cfg/recSubVols64.cfg -i your/folder/to/apoferritin-10787/process/tomos/TS_06/tomo_6.st
mpiexec -n 4 aiRecSubvol -u your/folder/to/apoferritin-10787/process/cfg/recSubVols64.cfg -i your/folder/to/apoferritin-10787/process/tomos/TS_26/tomo_26.st
mpiexec -n 4 aiRecSubvol -u your/folder/to/apoferritin-10787/process/cfg/recSubVols64.cfg -i your/folder/to/apoferritin-10787/process/tomos/TS_53/tomo_53.st
Note: we use the same merged motivelist for all individual reconstructions as aiRecSubvols is smart enough to extract only that part of the list that comes from the currently reconstructed tomogram.
aiAveraging
aiAveraging performs sub-tomogram-averaging, i.e. it tries to find the best orientation and shift to fit an individual particle (or sub-volume) on a given reference. As a starting reference, use the four-times binned reference that was created a few steps before. The low-pass filter is set to 20 which corresponds to roughly 9A resolution. This minimal resolution is needed to resolve alpha helices, the feature of apoferritin with the lowest resolution. Given the high symmetry, it is also not necessary to perform a full angular search, the angles can be restricted to +- 50 degrees, which is already very generous. In sum, this turns into the following configuration for aiAveraging, stored in your/folder/to/apoferritin-10787/process/cfg/averaging1.cfg:
CudaDeviceIDs = [0 1 2 3]
LP = 20
LPS = 3
HP = 0
HPS = 0
MotiveList = your/folder/to/apoferritin-10787/process/avg/motls/motlAll_0.motl
Particles = your/folder/to/apoferritin-10787/process/avg/parts/partInit_#_#.em
References = your/folder/to/apoferritin-10787/process/avg/refs/refOrig64Bin4_#_#.em
Wedges =
Mask = your/folder/to/apoferritin-10787/process/avg/mask64Bin4_#.em
RotateMask = false
MaxShift = 10
MaskCC =
RotateMaskCC = false
StartIteration = 0
IterationCount = 2
AngIter = 10
AngIncr = 5
PhiAngIter = 10
PhiAngIncr = 5
BestParticleRatio = 0.8
FourierFilterFileName =
CouplePhiToPsi = true
Method = STANDARD
CorrelationMethod = PHASECORRELATION
CompensateNoWBPWeighting = true
SubPixelRatio = 1
PhaseRandomizationLimit = 10
AddParticles = false
DoseWeighting = true
Symmetry = your/folder/to/apoferritin-10787/process/avg/octahedral.symm
RigidScan = false
SaveFilteredReference = true
Apoferritin is a symmetric protein and aiAveraging allows to make use of the symmetry. Save the following symmetry data in a text file called “your/folder/to/apoferritin-10787/process/avg/octahedral.symm”:
{
	"symmetry": {
		"displacement": [],
		"matrix": [
				[1.0,0.0,0.0,0.0,1.0,0.0,0.0,0.0,1.0],
				[-1.0,0.0,0.0,0.0,-1.0,0.0,0.0,0.0,1.0],
				[1.0,0.0,0.0,0.0,-1.0,0.0,0.0,0.0,-1.0],
				[-1.0,0.0,0.0,0.0,1.0,0.0,0.0,0.0,-1.0],
				[0.0,1.0,0.0,-1.0,0.0,0.0,0.0,0.0,1.0],
				[0.0,-1.0,0.0,1.0,0.0,0.0,0.0,0.0,1.0],
				[0.0,1.0,0.0,1.0,0.0,0.0,0.0,0.0,-1.0],
				[0.0,-1.0,0.0,-1.0,0.0,0.0,0.0,0.0,-1.0],
				[0.0,0.0,1.0,1.0,0.0,0.0,0.0,1.0,0.0],
				[0.0,0.0,1.0,-1.0,0.0,0.0,0.0,-1.0,0.0],
				[0.0,0.0,-1.0,1.0,0.0,0.0,0.0,-1.0,0.0],
				[0.0,0.0,-1.0,-1.0,0.0,0.0,0.0,1.0,0.0],
				[0.0,0.0,1.0,0.0,1.0,0.0,-1.0,0.0,0.0],
				[0.0,0.0,1.0,0.0,-1.0,0.0,1.0,0.0,0.0],
				[0.0,0.0,-1.0,0.0,1.0,0.0,1.0,0.0,0.0],
				[0.0,0.0,-1.0,0.0,-1.0,0.0,-1.0,0.0,0.0],
				[0.0,1.0,0.0,0.0,0.0,1.0,1.0,0.0,0.0],
				[0.0,-1.0,0.0,0.0,0.0,1.0,-1.0,0.0,0.0],
				[0.0,-1.0,0.0,0.0,0.0,-1.0,1.0,0.0,0.0],
				[0.0,1.0,0.0,0.0,0.0,-1.0,-1.0,0.0,0.0],
				[-1.0,0.0,0.0,0.0,0.0,1.0,0.0,1.0,0.0],
				[1.0,0.0,0.0,0.0,0.0,1.0,0.0,-1.0,0.0],
				[1.0,0.0,0.0,0.0,0.0,-1.0,0.0,1.0,0.0],
				[-1.0,0.0,0.0,0.0,0.0,-1.0,0.0,-1.0,0.0]
			],
		"name": "Octahedral symmetry without mirroring",
		"version": 1
	}
}
Averaging is run with the following command:
mpiexec -n 4 aiAveraging -u your/folder/to/apoferritin-10787/process/cfg/averaging1.cfgNote: even though the angular search range is restricted, the fine step of 5 degrees makes that one iteration will take some time to finish. Later iterations will be much faster, though.
Open the result („your/folder/to/apoferritin-10787/process/avg/refs/refOrig64Bin4_0_1.em“ –> referenceID 0_iteration 1) in aiClicker and inspect the FSC:
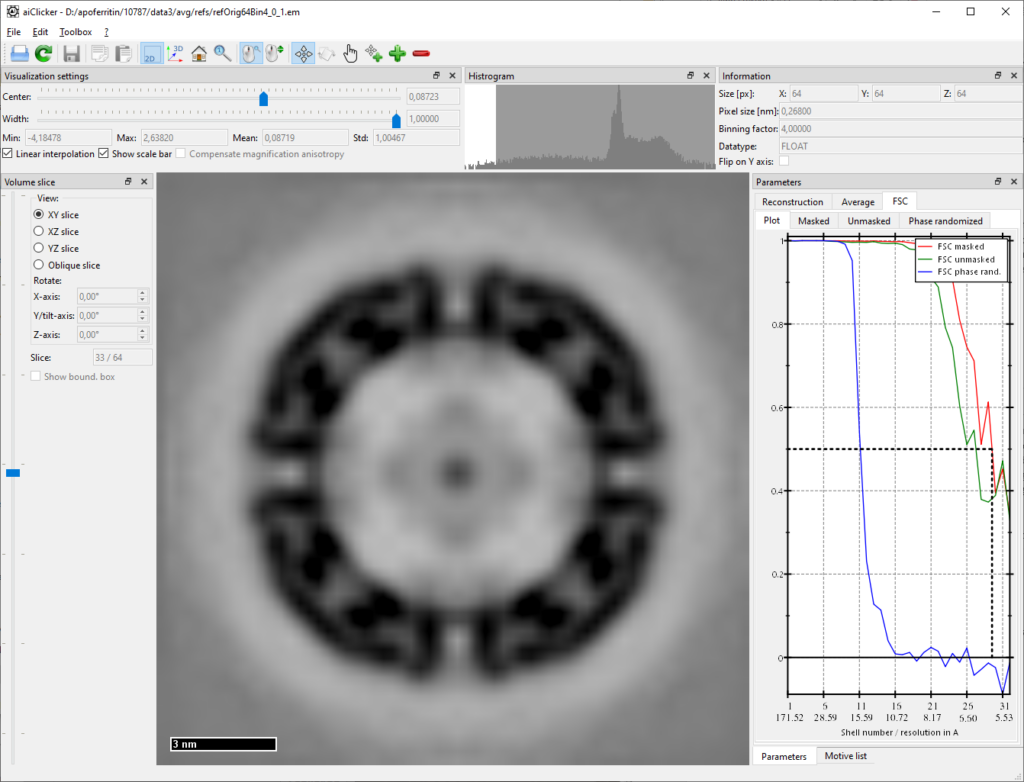
One can see that the achieved resolution is much higher than the set low-pass filter, a good indicator that no template bias occurred. The next two iterations will be adjusted accordingly, i.e. less low-pass filter and finer angular search around the previously found angles:
...
LP = 25
LPS = 3
...
StartIteration = 2
IterationCount = 2
AngIter = 5
AngIncr = 2
PhiAngIter = 5
PhiAngIncr = 2
...
Note: in order to maintain all previous settings and to allow for reproducing any intermediate results, it is good advice to save all further iterations in averaging in separate configuration files.
Averaging is run again with the command:
mpiexec -n 4 aiAveraging -u your/folder/to/apoferritin-10787/process/cfg/averaging2.cfgRefining the angles to 1-degree steps for two more iterations:
...
StartIteration = 4
IterationCount = 2
AngIter = 4
AngIncr = 1
PhiAngIter = 4
PhiAngIncr = 1
...
mpiexec -n 4 aiAveraging -u your/folder/to/apoferritin-10787/process/cfg/averaging3.cfg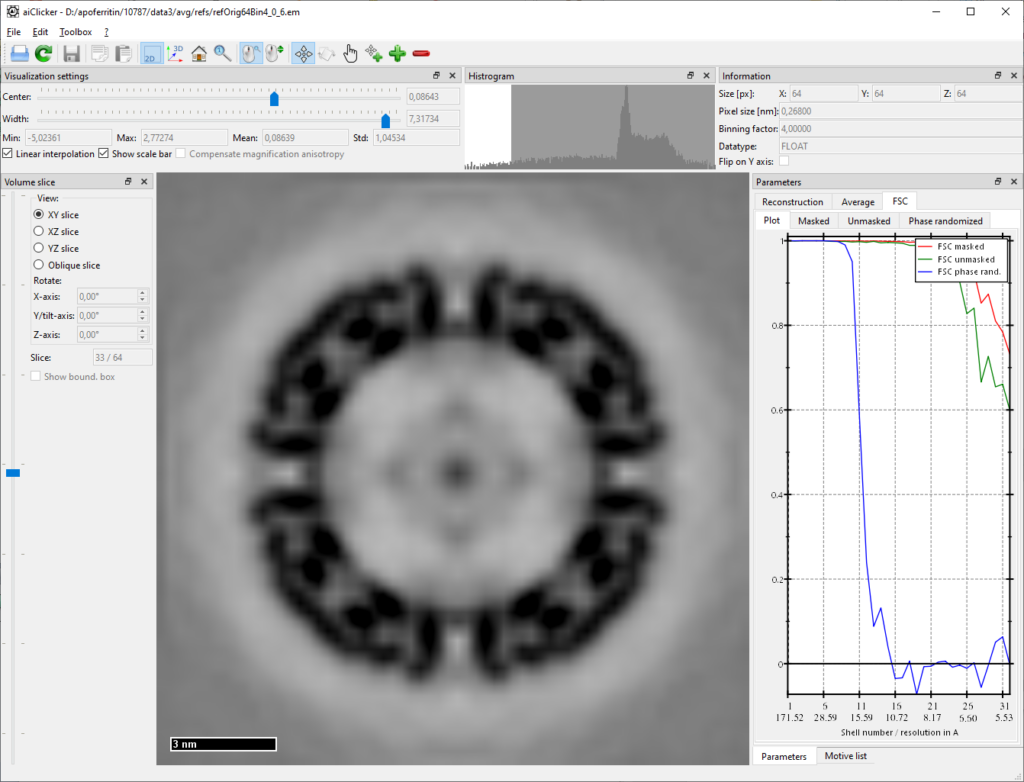
It is not possible to achieve any higher resolution with the four-times binned data, it is thus time to move over to 2-times binning – and new particle reconstructions are necessary to do so. Having already quite precise rotation angles defined, the new higher resolution particles should include these angles during reconstruction: The motive list needs to move the so called “post-reconstruction” displacements to the “pre-reconstruction” displacements so that aiRecSubvols takes them into account. To do this, run:
aiToolbox motivelist postToPre -i your/folder/to/apoferritin-10787/process/avg/motls/motlAll_6.motl -o motlPre1_6.motlAt the same time, this is a good time point to switch to gold-standard averaging, which means that one creates two independent references for two half-sets of all particles. The higher frequencies which are not contained in the four-times binned data are completely unknown so far and template bias is hence not possible. This means that any correlation in higher frequencies is later only based on true signal. The following command randomly assigns each entry in the motivelist either the reference number 0 or 1, where an even-odd pair is defined to form the two half-sets for one „merged reference“.
aiToolbox motivelist makeGoldStandard -i your/folder/to/apoferritin-10787/process/avg/motls/motlPre1_6.motl -o motlPre1GS_6.motl -randNow, use this new motivelist to reconstruct two-times binned particles with the following settings for aiRecSubvol (your/folder/to/apoferritin-10787/process/cfg/recSubVols128.cfg):
...
OutVolumeFile = /your/folder/to/apoferritin-10787/process/avg/parts/partPre1_#_#.em
...
OverSampling = 4
RecDimensions = 256 256 256
VolumeBinning = 2
...
CTFSliceThickness = 10
...
Binning = 1
...
BatchSize = 1000
MotiveList = /your/folder/to/apoferritin-10787/process/avg/motls/motlPre1GS_6.motl
...
mpiexec -n 4 aiRecSubvol -u your/folder/to/apoferritin-10787/process/cfg/recSubVols128.cfg -i your/folder/to/apoferritin-10787/process/tomos/TS_03/tomo_3.st
mpiexec -n 4 aiRecSubvol -u your/folder/to/apoferritin-10787/process/cfg/recSubVols128.cfg -i your/folder/to/apoferritin-10787/process/tomos/TS_04/tomo_4.st
mpiexec -n 4 aiRecSubvol -u your/folder/to/apoferritin-10787/process/cfg/recSubVols128.cfg -i your/folder/to/apoferritin-10787/process/tomos/TS_05/tomo_5.st
mpiexec -n 4 aiRecSubvol -u your/folder/to/apoferritin-10787/process/cfg/recSubVols128.cfg -i your/folder/to/apoferritin-10787/process/tomos/TS_06/tomo_6.st
mpiexec -n 4 aiRecSubvol -u your/folder/to/apoferritin-10787/process/cfg/recSubVols128.cfg -i your/folder/to/apoferritin-10787/process/tomos/TS_26/tomo_26.st
mpiexec -n 4 aiRecSubvol -u your/folder/to/apoferritin-10787/process/cfg/recSubVols128.cfg -i your/folder/to/apoferritin-10787/process/tomos/TS_53/tomo_53.stThe fourth averaging configuration is now adopted to gold-standard averaging and to the new particles and motivlist:
CudaDeviceIDs = [0 1 2 3]
LP = 35
LPS = 5
HP = 0
HPS = 0
MotiveList = your/folder/to/apoferritin-10787/process/avg/motls/motlPre1GS_6.motl
Particles = your/folder/to/apoferritin-10787/process/avg/parts/partPre1_#_#.em
References = your/folder/to/apoferritin-10787/process/avg/refs/ref128Bin2_#_#.em
Wedges =
Mask = your/folder/to/apoferritin-10787/process/avg/mask128Bin2_#.em
RotateMask = false
MaxShift = 10
MaskCC =
RotateMaskCC = false
StartIteration = 6
IterationCount = 4
AngIter = 5
AngIncr = 0.5
PhiAngIter = 5
PhiAngIncr = 0.5
BestParticleRatio = 0.8
FourierFilterFileName =
CouplePhiToPsi = true
Method = GOLDSTANDARD
CorrelationMethod = PHASECORRELATION
CompensateNoWBPWeighting = true
SubPixelRatio = 4
PhaseRandomizationLimit = 10
AddParticles = false
DoseWeighting = true
Symmetry = /home/kunz/Documents/ESPIAR/apo/avg/octahedral2.symm
RigidScan = false
SaveFilteredReference = true
Before new iterations of sub-tomogram averaging can be started, the new (independent) references must be created using:
mpiexec -n 4 aiAveraging -u your/folder/to/apoferritin-10787/process/cfg/averaging4.cfg -addThis will sum up the particles that were just reconstructed before. At the same time it will also combine the two half-set-references to a merged one (which will not be used for later averaging). Already at this stage, one should observe a resolution close to 4A:
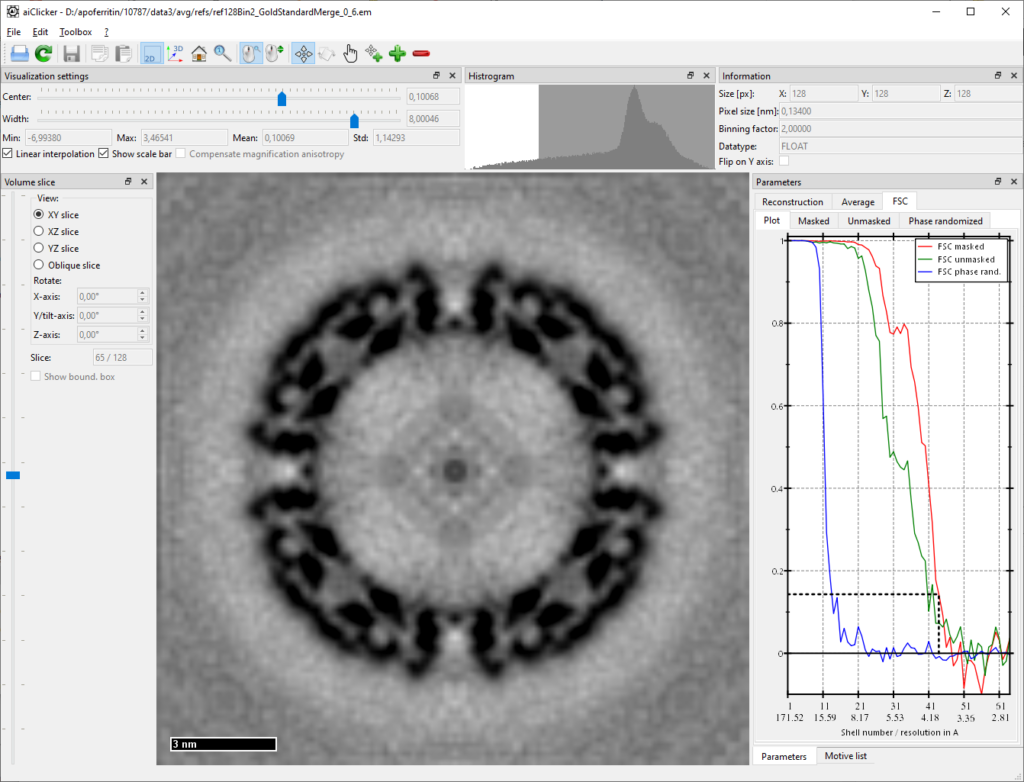
And finally new iterations:
mpiexec -n 4 aiAveraging -u your/folder/to/apoferritin-10787/process/cfg/averaging4.cfgAfter a few more iterations, the resolution should quickly get close to 3A, after the 9th iteration we obtained 2.95A using the relatively coarse mask as used during averaging:
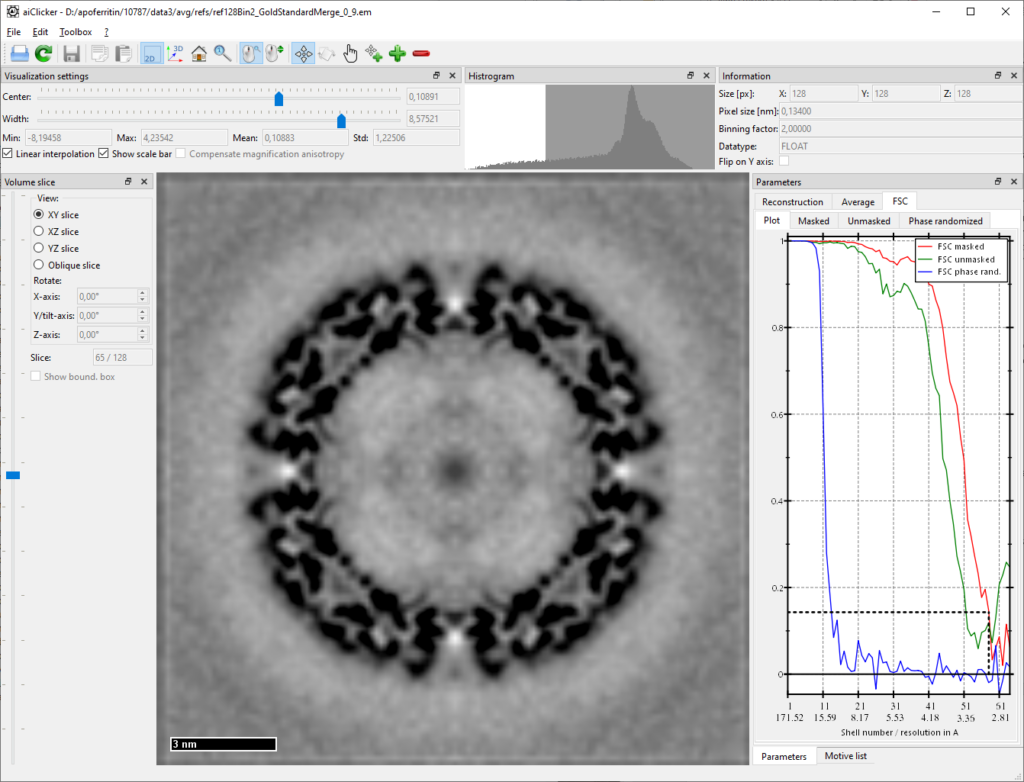
How to further refine the tilt-series alignment and the CTF to finally improve the resolution towards 2.5A, will be discussed here soon!